FEZ - FEZ Requirements
It took me some time to get my FEZ working for the first time. I decided to dedicate a webpage to it as it might save you some time.
Information
Sometimes I will specify a path to a certain application on your system. Please keep in mind these paths are working on my Windows 7 x64, but they can differ slightly on other operating systems or other versions of the .NET environment.
You need to download and install some software before you can start using the FEZ.
I am not going to place direct links to these software packages as they are updated frequenty. You can visit the FEZ Panda II download page [External].
You need to install the drivers before you connect the FEZ for the first time. To do this just execute the setup program.
Once the driver is installed you can connect the FEZ to your computer. An USB cable was included to the box. A power supply was not included with the FEZ but it is no absolute requirement to use an external supply. For most applications you can just power it with the USB cable.
The board should start working immediately: some LEDs will go on. You can now test the communication between the board and your computer. You can use the program MFDeploy.exe for it. This program comes with the SDK's you 've downloaded earlier. You can find it here:
'C:\Program Files (x86)\Microsoft .NET Micro Framework\v4.1\Tools\MFDeploy.exe'
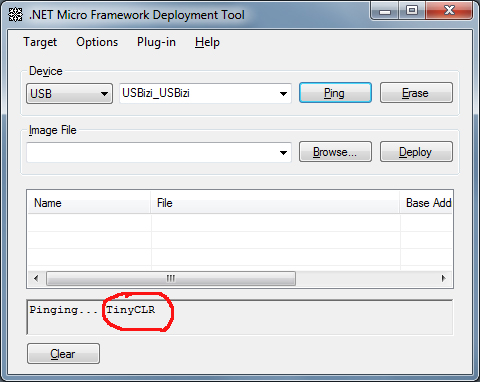
When you launch MFDeploy you will get a GUI screen as showed in the image at the left. First you will need to set the Device to 'USB'. If everything goes well the text 'USBizi_USBizi' should appear automatically.
Now you can ping your board by clicking the 'PING' button. MFDeploy will now send a message to the FEZ board. The result of the ping is shown in the textbox at the bottom of the screen: you will find the text 'TinyCLR' when the ping succeeds. This indicates the communication with your FEZ is working perfectly.
GHI electronic stresses you need to update the board's firmware before you start using it. I thought they exaggerated but it is true: not following they advise has cost me over an hour because the FEZ gave strange errors.
Each board has a certain firmware and contains files for the .NET micro framework. These files have a certain version number. This number has to match the version of the .NET micro framework that is installed on your computer. Even if you get a brand new FEZ board chances are high these versions are already obsolete. So my advise: perform a firmware upgrade immediately!
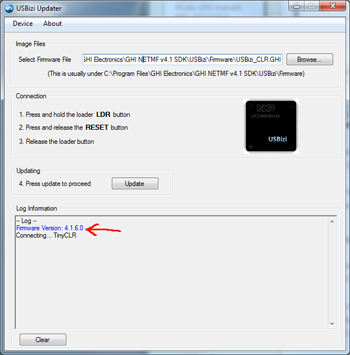
You can use a tool called USBizi Updater to find out the current firmware version of your board. The tool can be found under this path on your local computer: 'C:\Program Files (x86)\GHI Electronics\GHI NETMF v4.1 SDK\Firmware Update\USBiziUpdater.exe'
In USBizi you can click the menu Device/Get Firmware version. Here the current version of your firmware will be shown at the bottom of the screen. My version is 4.1.6.0.
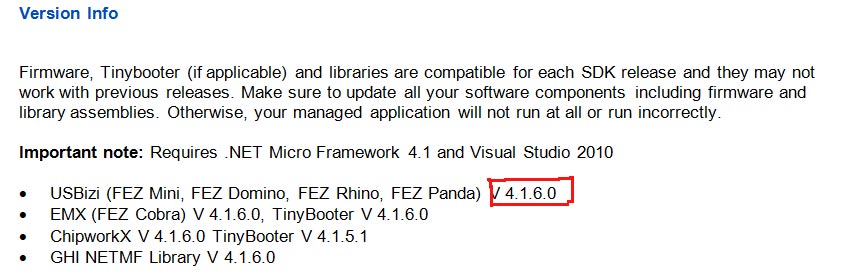
The next question emerges: is this the good version or not? To find this out you should consult the documentation of the NETMF SDK. It can be found under: 'C:\Program Files (x86)\GHI Electronics\GHI NETMF v4.1 SDK\Release Notes.rtf'. At the first page of this document you can find out the required firmware version for your board. If the version of your board is older an update is required.
You can use the same USBiziUpdater.exe program to update the firmware. The needed firmware file is selected automatically. All you need to to is to follow the steps which are indicated on the screen. The mentioned buttons can be found on the FEZ board.
The firmware update should start immediately. After the update your Windows might indicate a new hardware was found: You need to specify the path of the driver of the boardloader. This path is: 'C:\Program Files (x86)\GHI Electronics\GHI NETMF v4.1 SDK\USB Drivers\GHI_Bootloader_Interface\GHI_BootLoader_Interface.inf' (Path can slightly differ).
Now the firmware upgrade is done, you can start using your board. Download this PDF manual [External] to learn how to start.
Copyright ©1998-2022 Vanderhaegen Bart - last modified: August 24, 2013
