Velleman K8055 - [Velleman K8055 Class V2.0]
Velleman K8055 Class V2.0 |

|
This page is about the second version of the K8055 class, written for Visual Basic .NET. This class allows you to communicate very easy with the Velleman K8055 computer interface card. I wrote the class for a quicker development of my K8055 testing applications.
The class is the successor of the earlier version which I wrote in 2011. This new version is more advanced and is capable to control multiple K8055 cards simultaneously. I made a separate webpage for this new class because the class had some major changes and is not completely compatible with the previous version of the class. You can upgrade older projects to this new class, but in certain cases you will need to make some adjustments to your own source code.
The libraries provided by Velleman are easy to use. So why would you use my class instead? Because it is even more easy to use! It offers support to control multiple cards and Events-generation, without worrying too much about coding.
My class provides a very easy access to the K8055 card. After you add the class to your project, you can start controlling the K8055 in just 3 lines of source code. This code should be added to the main form of a VB.Net project:
    Dim myK8055 As New K8055()
    myK8055.connect(SK5:=True, SK6:=True)
    myK8055.setDigitalOutput(1)
The first line creates an instance of the class K8055. It can be accessed through the 'myK8055' variable. Then you can create a connection with the K8055. Each card has its own address which is set by 2 jumpers SK5 and SK6. You need to specify the state of these jumpers (True means the jumper is installed). The third line of the program will set the digital output channel #1.
For larger programs you could move the declaration of the myK8055 to the class level. Then the K8055 becomes accessible from any sub or function. The code below shows you how to do that. The sample assumes you have two buttons on a form: cmdSetChannel and cmdClearChannel.
    Private myK8055 As New K8055()

    Private Sub frmMain_Load() Handles MyBase.Load
    	myK8055.connect(SK5:=True, SK6:=True)
    End Sub

    Private Sub cmdSetChannel_Click() Handles cmdSetChannel.Click
    	myK8055.setDigitalOutput(1)
    End Sub

    Private Sub cmdClearChannel_Click() Handles cmdClearChannel.Click
    	myK8055.clearDigitalOutput(1)
    End Sub
Technically speaking it is possible to use the analog outputs as additional digital outputs. Just like the digital outputs, the analog outputs have open collector outputs. By using just two possible values, either 0 or 255, you can control the output.
So it has always been possible to mix analog and digital outputs, but you were required to code everything yourself. The new K8055 class now has an option called emulate_DAC_as_digital_outputs. When this option is active, each card will have 8 + 2 emulated digital outputs. Each output can be controlled in exactly the same way:
    myK8055.connect(0)

    With myK8055
      .emulate_DAC_as_digital_outputs = True

      .setDigitalOutput(1)
      .setDigitalOutput(2)
      .setDigitalOutput(3)
      .setDigitalOutput(4)
      .setDigitalOutput(5)
      .setDigitalOutput(6)
      .setDigitalOutput(7)
      .setDigitalOutput(8)
      .setDigitalOutput(9)	' DAC channel 1
      .setDigitalOutput(10)	' DAC channel 2

      .clearAllDigitalOutputs()	' will clear the DAC channels as well
    End With
You can still address the analog outputs while this option is enabled, but their values can only be set to either 0 or 255. An attempt to change the value to another value will trigger an Exception (error).
As of August 2017, the class now supports to control up to FOUR K8055 cards at the same time. This gives you access to 32 digital outputs, 20 digital inputs, 8 analog outputs and 8 analog inputs. The channels can adressed in a very simple way: Just specify the global channel number you want to use, the K8055 class will automatically send the command to the correct card. The following code will start the first digital OUTPUT in a system with 4 connected interface cards:
    Dim myK8055 As New K8055()
    myK8055.multiCardMode = True
    myK8055.connect(0)
    myK8055.connect(1)
    myK8055.connect(2)
    myK8055.connect(3)

    myK8055.setDigitalOutput(1)
    myK8055.setDigitalOutput(9)
    myK8055.setDigitalOutput(17)
    myK8055.setDigitalOutput(25)
The following table illustrates which input/output numbers correspond with a given card address:
| address | SK5 | SK6 | Digital Out (Default) |
Digital Out (DAC emul) |
Digital In | Analog Out | Analog In |
| 0 | ON | ON | 1-8 | 1-10 | 1-5 | 1-2 | 1-2 |
| 1 | OFF | ON | 9-16 | 11-20 | 6-10 | 3-4 | 3-4 |
| 2 | ON | OFF | 17-24 | 21-30 | 11-15 | 5-6 | 5-6 |
| 3 | OFF | OFF | 25-32 | 31-40 | 16-20 | 7-8 | 7-8 |
This implies that, if you have only one connected K8055 card with a hardware address other than 0, the number of the first channel would not be 1. Example: for a card with hardware address 3 you would need to call setDigitalOutput(25) to enable the first LED. In many cases this would not be desirable so I have added the option remap_single_card_as_first to the class. If set to true, the first channel can be addressed with setDigitalOutput(1).
    Dim myK8055 As New K8055()

    myK8055.connect(3)
    myK8055.remap_single_card_as_first = true
    myK8055.setDigitalOutput(1)
    myK8055.setDigitalOutput(25)	' same effect as calling setDigitalOutput(1)
The K8055 class supports the generation of events: in case one of the K8055's inputs changed, the class will automatically raise an event. Here you can put your own code. This simplifies your programming a lot. Currently the following events are supported:
Before you can use events the K8055 object definition must include the WithEvents keyword. The folling example show a small program that displays a messagebox when the channel 1 is pressed IN:
    Private WithEvents myK8055 As New K8055()

    Private Sub digitalInputChangedOn(cardid As Integer, channel_of_card As Integer, channel As Integer, state As Boolean) Handles myK8055.digitalInputChangedOn
      If channel_of_card = 1 Then
      	MsgBox("button was pressed")
      End If
    End Sub


    Private Sub Form1_Load(sender As System.Object, e As System.EventArgs) Handles MyBase.Load
	myK8055.setupEvents(enable:=True, polling_interval:=50, mode:=K8055.EventConfiguration.ALL_DIGITAL)
    	myK8055.connect(0)
    End Sub
The events can be configured by calling the setupEvents() method. Here you need to specify three parameters:
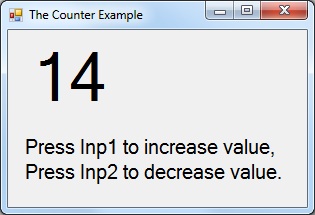
The power of the K8055 class becomes unleashed when you write a larger application for the card. Assume the following case: you are asked to design a counter application. Initially the counter is set to 0. Each time you press the button INP1 the counter is increased with 1. Each press to button INP2 decreases the counter with 1.
This means you need to add some code to scan the K8055 frequently to determine if a button was pressed. You also need to detect transitions in the current state (when the button goes from pressed to unpressed or the other way). A simple program like this already involves a certain amount of source code.
My K8055 class allows you to write this program with no more than 15 lines of code. This is possible because the class supports events which are triggered when an input changed.
    Public Class frmMain
      Private WithEvents myK8055 As New K8055()
        Private counter As Integer

        Private Sub frmMain_Load() Handles MyBase.Load
        Label1.Text = CStr(counter)
        myK8055.setupEvents(True, 100, K8055.EventConfiguration.ALL_DIGITAL)
        myK8055.connect(SK5:=True, SK6:=True)
      End Sub

      Private Sub myK8055_digitalInputChangedOn(cardid As Integer,
                        channel_of_card As Integer,
                        channel As Integer,
                        state As Boolean) Handles myK8055.digitalInputChangedOn

        If channel = 1 Then counter += 1
        If channel = 2 Then counter -= 1
        Label1.Text = CStr(counter)
      End Sub
    End Class
The following example shows the full power of the new K8055 class. This code can be placed into the code of a form. The program controls a basic light-computer on two K8055 cards at the same time. Each card has an independent speed-setting which can be selected by pressing the buttons 1-5. You can see a video demonstration on YouTube.
    ' Declarations
    Private WithEvents myK8055 As New K8055()
    Private WithEvents mTimer As New Timer
    Private actualSpeedSetting() As Integer

    Private Sub Form1_Load() Handles MyBase.Load
      ' Card Setup & Connection
      With myK8055
        .multiCardMode = True
        .emulate_DAC_as_digital_outputs = True
        .setupEvents(True, 50, K8055.EventConfiguration.ALL_DIGITAL)

        ' Add a separate line for each card to connect (0-3)
        .connect(0)
        .connect(1)
      End With

      ' Setup of the timer & speed data
      ReDim actualSpeedSetting(myK8055.countConnectedCards() - 1)
      mTimer.Interval = 10
      mTimer.Enabled = True
    End Sub


    Private Sub myK8055_digitalInputChangedOn(cardid As Integer,
                            channel_of_card As Integer,
                            channel As Integer,
                            value As Boolean) Handles myK8055.digitalInputChangedOn
      ' Update speed setting for the selected card
      actualSpeedSetting(cardid) = (5 * channel_of_card) - 5
    End Sub


    Private Sub mTimer_Tick() Handles mTimer.Tick
      Static delayStepsKeeper(myK8055.countConnectedCards() - 1) As Integer
      Static currentLightEffectStatus(myK8055.countConnectedCards() - 1) As Integer

      For i As Integer = 0 To myK8055.countConnectedCards() - 1
        delayStepsKeeper(i) += 1
        If delayStepsKeeper(i) > actualSpeedSetting(i) + 5 Then
          delayStepsKeeper(i) = 0
          'update k8055 channels & calculate following effect
          myK8055.setDigitalEffect(i, currentLightEffectStatus(i))
          currentLightEffectStatus(i) = currentLightEffectStatus(i) << 1
          If currentLightEffectStatus(i) = 0 Or currentLightEffectStatus(i) > Math.Pow(2, 9) Then
          currentLightEffectStatus(i) = 1
          End If
        End If
      Next
    End Sub
Make no mistakes: this class is *NO* replacement for the K8055D.DLL file. The DLL still has to be included with all your programs. You just don't need to call the K8055D.DLL directly because my class does it for you.
Here you can download the files for this project: the K8055 counter class (zipped Visual Basic CLASS file), the manual for the class (PDF) and a sample Visual Basic .NET project.
Copyright ©1998-2022 Vanderhaegen Bart - last modified: August 19, 2017
